Tutorial
BeginnerTurn Your AMS Export Into an Ontology
Drop in a CSV from your association management system and get a real ontology in under a minute: entity types, attributes, named relationships, and a graph you can see.
Time needed: About 15 minutes
Before you start:
- A CSV export from your AMS (or use our sample)
- Nothing to install
AMS Ontology Csv Association staff
By the end of this tutorial you will have turned one AMS export into a real ontology: named entity types, attributes that belong to them, and named relationships, downloadable as a schema and visible as a graph. The pass takes under a minute once the CSV is ready; this page takes about fifteen minutes because the worked example explains every choice. You need a CSV export from your AMS (one row per member, header row on top) or the sample we include. Nothing to install, and nothing you paste leaves the page.
Try it now: the AMS-to-ontology demo runs the full pipeline in your browser on the sample first, so you see a finished result before you touch anything. Your email gets you the starter kit at the bottom of that page: the sample CSV and a one-page cheat sheet.
Step 1: pull one honest export
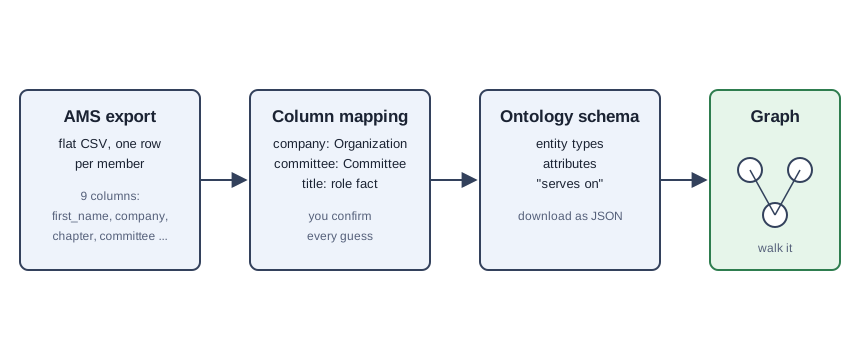
Export the fields you reason about: names, emails, employers, titles, chapters, committees, certifications, join dates. One row per member, header row on top, no cleaning first. Blank cells simply become missing facts.
Leave the sensitive columns out on purpose. Payment records and note fields have no business in an ontology exercise: the demo runs entirely in your browser so pasted data never leaves the machine, but the habit matters more than the setting.
Step 2: drop it into the mapper
Paste the CSV into the demo, pick the file, or keep the sample already loaded. The mapper guesses each column’s role from the header: first_name, last_name, and email become facts about a person; company becomes an organization; chapter, committee, and certification become what their names say; title is a role fact and member_since a date fact. Anything unrecognized becomes a person fact, the safe default, and every guess has a dropdown.
That ten-second guess is the first real ontological decision; the rest of this tutorial asks it carefully, five ways.
Step 3: ask the five questions for each column
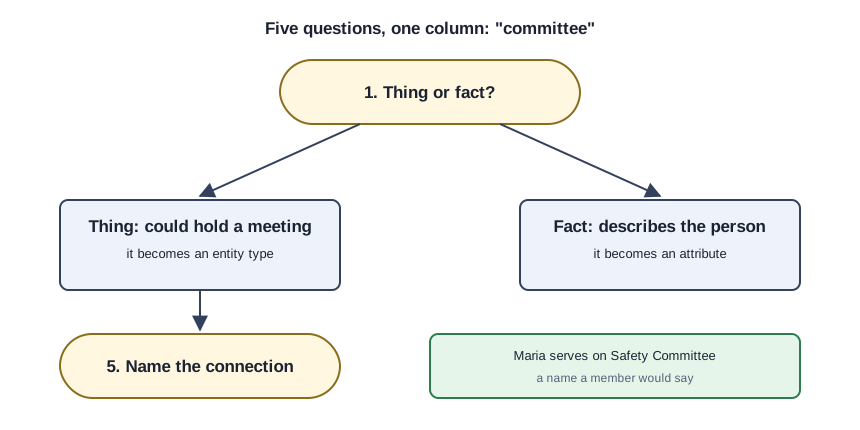
Ask these five questions for every column, in order:
- What kind of thing does this column name?
- Is it a fact about something, or a thing in its own right?
- If it is a fact, which thing does it describe?
- If it is a thing, what connects it to the member?
- What do we call that connection, in words a person would say?
The test for question two is concrete: could the value hold a meeting? “North Chapter” could; “Executive Director” cannot, it describes Maria; “2018” cannot, it describes when she joined. Things become entity types. Facts become attributes of the person.
Question five is where homemade data models fail silently. An unnamed line between Maria and the Safety Committee is a guess waiting to happen. Name it the way a member would say it: “serves on,” not “associated with.” The company line is “works for,” the chapter line “belongs to,” the certification line “holds.” Librarians formalized this discipline decades ago: NISO Z39.19 is the standard for building controlled vocabularies, and its whole subject is pinning each concept to one term and managing the terms over time. Your relationship names are a small controlled vocabulary, and they deserve the same care.
Step 4: confirm the relationships you keep
The demo offers four named relationships, all checked by default: members work for companies, members belong to chapters, members serve on committees, members hold certifications. Uncheck any line that does not fit your association. If your chapters are just geography and nobody belongs to one in any meaningful sense, uncheck it: an ontology that claims a connection you do not have is worse than one that omits it.
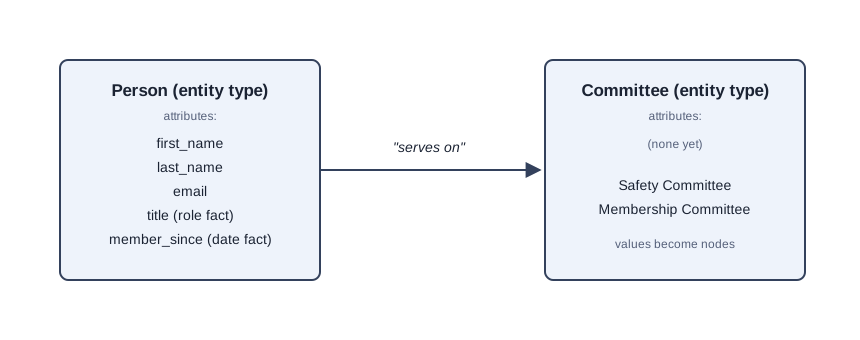
This is also the moment to fix guesses the sample values expose: a title column full of “Owner” entries is still a role fact, not a company. Header names lie sometimes; sample values tell the truth.
Step 5: generate, walk, and check
Press “Generate ontology.” You get the schema as JSON with a download button, and a graph of your actual rows below it. Click any dot to walk its connections; every connection is a button.
Walking is the quality check. Find one line that reads wrong and trace it back to the question that produced it. A member “holding” a chapter means question two went the wrong way. Two companies that are really one company spelled two ways means your export needs one cleanup pass. Fix the mapping or the data and regenerate. The schema download, ontology-schema.json, is the written form of every decision you just made.
The Riverbend run, line by line
This is a teaching example, not a case study. The Riverbend sample has six members and nine columns, detected as follows:
| Column | Sample values | Detected as |
|---|---|---|
| first_name | Maria, James, Alicia | Person attribute |
| last_name | Santos, Park, Tran | Person attribute |
| [email protected] | Person attribute | |
| company | Riverbend Trade Association, Riverbend Freight Co. | Organization |
| title | Executive Director, Safety Manager | Role attribute |
| chapter | Headquarters, North Chapter | Chapter |
| member_since | 2018, 2020, 2019 | Date attribute |
| committee | Safety Committee, Membership Committee | Committee |
| certification | Certified Logistics Professional | Certification |
Every guess is correct here, which is why you should still read the row: confirming is the habit this tutorial sells. Empty cells draw no line. The confirmed mapping keeps all four relationships checked, and the generated schema reads:
{
  "entityTypes": [
    {
      "name": "Person",
      "attributes": ["first_name", "last_name", "email", "title", "member_since"]
    },
    { "name": "Organization", "attributes": [] },
    { "name": "Chapter", "attributes": [] },
    { "name": "Committee", "attributes": [] },
    { "name": "Certification", "attributes": [] }
  ],
  "relationships": [
    { "name": "works for", "from": "Person", "to": "Organization" },
    { "name": "belongs to", "from": "Person", "to": "Chapter" },
    { "name": "serves on", "from": "Person", "to": "Committee" },
    { "name": "holds", "from": "Person", "to": "Certification" }
  ]
}
The finished graph holds six members tied to three companies, three chapters, two committees, and one shared certification. Priya Nair and Tom Becker share one certification dot: two members no spreadsheet could connect. That shared dot is the payoff you can point at.
Check your result: the graph answers a member question
Pick a question your flat export cannot answer at a glance. “Which North Chapter members hold a certification?” Walk the North Chapter dot’s “belongs to” lines to James Park, Robert Dale, and Priya Nair, then check for a “holds” line: only Priya Nair has one. If you can trace the answer by clicking, the ontology is sound.
The mapping mistakes that make quiet messes
Accepting every auto-detection without reading the sample values is the first mistake: the guesses are heuristics; your headers are the only truth the demo has. Promoting title to an entity type is the second: a job title describes the person, and an ontology full of title nodes answers nothing. Leaving a relationship line unnamed is the third: an unnamed line is a guess, and guesses rot. Exporting your entire AMS, notes and payment fields included, is the fourth. Renaming a relationship after generating is the fifth: the schema JSON on disk still has the old name, so regenerate and re-download.
Take the starter kit
The starter kit is the Riverbend sample CSV and a one-page cheat sheet: each column type, what it becomes, one example. Free with your email through the form on the demo page.
Where the five questions came from
The five questions compress the method in the Association Ontology book, the deeper dive on graphs for association work: an ontology is a framework you can walk, and walking it surfaces connections that were previously unnamed and therefore unactionable. Start with the Association Ontology article.
Your generated graph has a second life, too: press “Open in graph builder” on the demo page and your result loads into the knowledge graph builder, where you can keep building on it by hand. The export was the starting point; the graph is the working surface.